
Project Setup
Create a Pixscape Studio project and configure where its editable and exported files belong.
On this page
Create a project from File > New. To review or update an open project’s configuration, use File > Project settings.
The most important concept is the difference between the Studio project and the exported project.
Studio project vs exported project
A Pixscape Studio project is the editable source project used by Pixscape Studio.
It contains the project structure, scenes, assets, editor metadata, and all information needed to continue editing your game content inside Pixscape Studio.
The exported project is different. It is the generated output used by your game/runtime project.
In practice:
- The Studio project is the source of truth.
- The export directory is the generated runtime output.
- Your LibGDX game should load the exported assets.
- You should not treat the export directory as the main editable project.
- Re-exporting from Studio can overwrite generated runtime files.
A common setup is:
- Keep the Studio project in a dedicated Pixscape project folder.
- Set the export directory to the assets folder of your LibGDX game, or to a folder that will be copied into it.
- Edit content in Pixscape Studio.
- Export when the game project needs updated assets.
Creating a new project
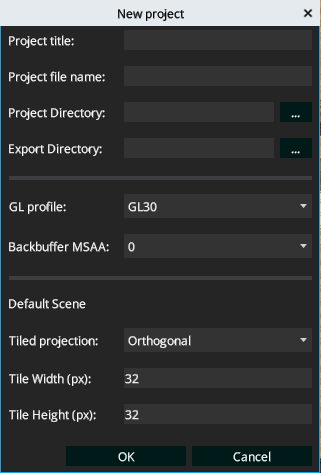
Use File > New to create a new Pixscape Studio project.
The dialog contains two different kinds of paths:
Project Directory
This is where the Pixscape Studio project will be saved.
This folder belongs to Pixscape Studio. It contains the editable project file and the data needed to reopen and edit the project later.
Export Directory
This is where Pixscape Studio will export runtime-ready assets.
This folder is meant to be consumed by your game project. For example, it can point to the assets directory of a LibGDX project.
Do not confuse it with the Studio project directory.
Project title
The human-readable name of the project.
Project file name
The filename used for the Studio project file.
Use a simple lowercase name with hyphens when possible, for example:
tiled-iso-demo
GL profile
The GL profile defines the rendering profile used by the project.
Use the default value unless you have a specific reason to change it.
Backbuffer MSAA
Controls multisampling for smoother rendering.
A value of 0 disables MSAA.
Higher values can improve visual quality but may cost performance and may not be supported on every platform.
Editing project settings
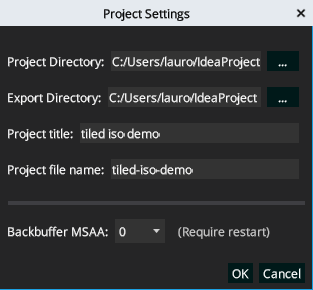
Use File > Project settings to review or update the main project configuration.
This dialog lets you change:
- Project directory
- Export directory
- Project title
- Project file name
- Backbuffer MSAA
The most common reason to open this dialog is to change the export directory after creating or moving a game project.
For example, you may create the Studio project first, then later point the export directory to your actual LibGDX game assets folder.
Changing the export directory does not move the Studio project itself. It only changes where exported runtime assets are generated.
Backbuffer MSAA changes require a restart to fully apply.
Recommended workflow
- Create a Pixscape Studio project with
File > New. - Choose a safe
Project Directoryfor the editable Studio project. - Choose an
Export Directoryfor generated runtime assets. - Build scenes and assets in Pixscape Studio.
- Export the project when your game needs updated runtime assets.
- In your game, load the exported Pixscape assets.
Checklist
- The
Project Directoryis where the editable Studio project lives. - The
Export Directoryis where runtime-ready assets are generated. - The Studio project is the source of truth.
- The export directory can be overwritten when exporting again.
- Use
Project settingsif the export path needs to change. - Restart Studio after changing Backbuffer MSAA.