
Spatial V3 for 2.5D depth
Author 2.5D isometric depth and connected Spatial structures visually, with optional generated collisions for LibGDX scenes.
On this page
In an isometric game, actors must move consistently in front of and behind walls, buildings, and other structures. Pixscape Spatial provides this 2.5D depth authoring visually in Studio.
Spatial V3 combines two independent controls: Universal Layer participation for actors, and Spatial Depth for each Tiled Map. Spatial augments normal Universal Layer and z ordering; it does not replace scene composition or turn the scene into 3D.
What Spatial V3 solves
A multi-tile building can behave as one connected structure instead of a collection of unrelated depth blocks. Its compiled exterior geometry gives an actor a consistent front/behind relationship at corners, junctions, crossings, and enclosed rooms. Optional Physics collision can stay synchronized with the same authored wall footprint.
Two independent Spatial controls
Universal Layer Spatial participation
Select the Universal Layer that contains the actors, then enable Spatial in Layer Properties. This lets eligible entities effectively owned by that Layer participate in Spatial ordering.
Scene Physics must be enabled first. Studio currently allows only one Universal Layer to have actor Spatial participation enabled at a time; enabling it on a second Universal Layer is rejected. Disabling participation does not delete Spatial Actor values or the authored Physics footprint on its entities.
Tiled Map Spatial Depth
Select a Tiled Map and enable Spatial Depth in Map Properties. This gives that Map its own default altitude, default height, cell depth data, and Spatial walls.
Map Spatial Depth does not enable Spatial on the owning Universal Layer and does not consume the one-Layer actor participation slot. Multiple Tiled Maps may use Spatial Depth independently. Neither control automatically enables the other.
Prepare a Tiled Map
- Select the Tiled Map in
Items. - Enable
Spatial Depthin Map Properties. - Set
Default AltitudeandDefault Heightfor new Spatial volumes. - Expand the Tiled Map in
Items. - Select
Spatial volumes.
Selecting Spatial volumes enters the Spatial editing context, and the top-center indicator shows Mode: Spatial.
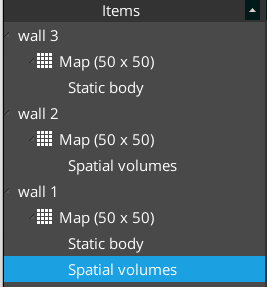
Spatial volumes belongs to the Tiled Map editing structure.The Map’s Default Altitude and Default Height belong to its Spatial Depth state. They are separate from the Altitude and Height authored on each Spatial Actor and are not inherited from the Universal Layer.
Create Spatial walls
- Select
Spatial volumesunder the prepared Tiled Map. - Drag a rectangle across occupied Map cells.
- Release the pointer to create the Spatial wall.
- Select the resulting wall to adjust its footprint or properties.
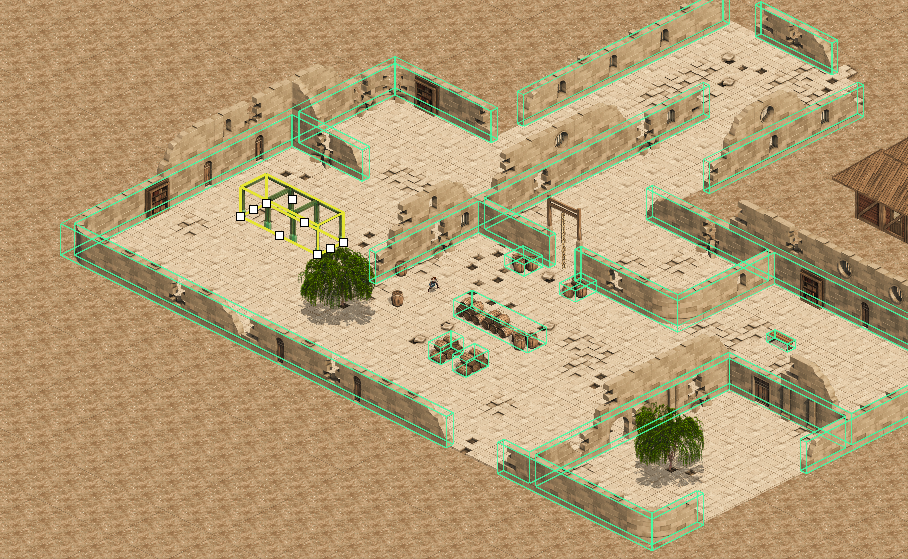
Creation resolves the drag to a filled rectangle of occupied cells. Empty outer rows or columns are trimmed; an internal hole or non-rectangular occupied selection is rejected. Creation and subsequent edits participate in normal undo and redo.
Connected structures
Each Spatial wall has a rectangular footprint and a Structure ID. Compatible intersecting walls join automatically, supporting straight walls, corners, T junctions, crossings, U shapes, rooms, and larger compound outlines.
Members of one structure share Structure altitude and Structure height. Adding or editing a wall can merge compatible structures; incompatible joins, duplicates, full containment, and invalid junctions are rejected atomically.
Edit Spatial walls
Select a wall to open SPATIAL WALL Properties. The current controls are:
Name (optional)andStructure IDX,Y,Width, andDepthStructure altitudeandStructure heightActor occluderPhysics collisionLight occluder,Shadow caster, andParticle occluder
Use the footprint fields or Canvas handles to align the wall with the part of the artwork that touches the ground. Editing structure altitude or height updates the connected structure as one authored structure. Some footprint edits are constrained when they would disconnect or invalidate a junction.
Tileset Cell, Anchor, and Offset settings affect alignment. See Import Assets & Tilesets before fine-tuning walls, and Canvas for general Canvas interaction.
Enable Spatial for actors
- Enable Scene Physics.
- Select the Universal Layer that contains the actors and enable
Spatialin Layer Properties. - Select an eligible actor.
- Enable
Spatial Actorin its Properties. - Set
AltitudeandHeightas required. - Adjust its Spatial footprint with the normal Physics tools when needed.
Studio currently enables Spatial Actor authoring for supported Sprite and Animation entities with valid placement, Scene Physics enabled, and an effective Universal Layer whose Spatial option is enabled.
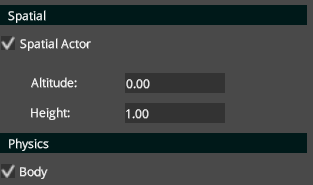
Spatial Actor footprint
A Spatial Actor needs one valid authored Physics footprint marked for Spatial use. When enabling Spatial Actor, Studio can create a default circular footprint from valid visual bounds if none exists. This is only a starting point: use normal Physics editing to align it with the actor’s ground-contact area.
Spatial ordering uses this footprint, not the actor’s entire sprite rectangle. A footprint that is too large or offset incorrectly makes front/behind transitions happen too early or too late. Conflicting marked footprints are invalid.
Altitude and Height
Altitude is the bottom of the actor’s vertical Spatial volume. Height is its vertical extent. Effective participation requires a Spatial-enabled owning Universal Layer, valid Spatial Actor state, one valid footprint, positive Height, and an otherwise renderable entity.
These actor values are independent of the Tiled Map’s Default Altitude and Default Height. Preview the scene and move the actor around every side, corner, and opening to verify both horizontal and vertical overlap behavior.
Game Object members
Eligible members of a Game Object hierarchy can participate as Spatial Actors. A member inherits its effective Universal Layer from the top-level Game Object root, so the root must live on the Spatial-enabled Universal Layer. Each eligible Sprite or Animation member keeps its own Spatial volume and footprint.
Physics collision
Enable Physics collision on a Spatial wall to create and manage static collision derived from that block’s footprint. The relationship belongs to the Tiled Map’s authored Physics and Spatial state, and the collision is updated when the Spatial geometry changes.
The derived geometry is not an independent arbitrary shape. Edit the Spatial wall to reshape it; use the linked Physics controls only for supported material, sensor, or filtering settings. See Physics for general body and shape authoring.
Spatial and normal ordering
Spatial adds actor relationships to normal Universal Layer and z ordering; it does not replace them. Tiled Map cells remain in the Map’s authored ordering model while Spatial evaluates participating actors against Map cells and Spatial Blocks.
Occlusion flags and current limits
Actor occluder controls actor Spatial ordering. Light occluder, Shadow caster, and Particle occluder are stored and compiled, but their downstream light, shadow, and particle consumers are not implemented yet, so those flags do not currently add the corresponding rendering effects.
Current authoring limits include one Spatial-enabled Universal Layer for actor participation, rectangular individual wall blocks, shared altitude and height within a connected structure, and rejection of invalid duplicates, containment, or junction edits.
Troubleshooting
Cannot enable Spatial on a Universal Layer
Confirm that Scene Physics is enabled and that another Universal Layer is not already Spatial-enabled.
Spatial Actor cannot be enabled
Confirm that the selection is a supported Sprite or Animation entity with valid visual bounds and footprint state, Scene Physics is enabled, and its effective Universal Layer has Spatial enabled. For a Game Object member, check the Layer containing the top-level root.
Dragging does not create a Spatial wall
Confirm that the selected Tiled Map has Spatial Depth enabled, Spatial volumes is selected, and the drag resolves to a valid filled rectangle of occupied Map cells.
An actor never changes depth
Check Universal Layer participation, Spatial Actor, positive Height, a valid footprint, and the relevant Tiled Map Spatial Depth and structures.
An actor switches too early or too late
Align the actor footprint with its ground contact area, then check the wall footprint and tileset alignment.
Physics collision cannot be freely reshaped
Spatial owns the derived collision geometry. Edit the Spatial wall or block instead of treating its linked Physics shape as independent.
Runtime control
For gameplay control of Universal Layer participation, actor volumes, and Tiled Map Spatial Depth, see the Spatial API. See Items & Properties for the shared selection model.